Pages

Showing posts with label Christmas Projects. Show all posts

Wednesday, November 9, 2011

Small Christmas Tree Tutorial

'Tis the season for Craft Shows, Fairs and Boutiques!  They are all great opportunities to buy handmade items from local artists and find that "one of a kind" gift for the hard-to-shop-for-person on your list!

 One of the downsides of participating in any type of "manning a booth" is the time between sales.  Sharing a booth can create blocks of time, if you are taking turns helping the customers.  This past weekend there were three of us "manning the booth" in Canton.

I'm never one to sit for too long, so I took along some "hand work" to fill in any time.  My sister also brought along handwork...she strung some new  necklaces...which she immediately sold when she completed them! 

I worked on some Christmas Tree ideas I had.  I saw a picture of a small Christmas tree created from fabric yo-yo's.  Cute, but I didn't want to have to cut and sew something to create my tree.

I had plenty of left over red and teal tulle and fabric from Emily's wedding, and I liked the fabric flowers I recently made, so I decided to combine the two.


You want to start with a 5-petal flower pattern.  I didn't have one, but it's easy enough to draw one.  I created 5 different sizes by the time I had perfected my trees. Each petal pattern is about 1/4" bigger between each petal size.  You may want to adjust yours, depending on how big you make your tree.


I cut at least 4 to 5 flowers from each color and each size.


I started with the tulle and cut 4 flower petals from each of the sizes (1-5).
Here I have the red and teal tulle mixed.


The fabric I used for the petals was the same fabric I used to create Emily's band on her wedding dress.
The wire can be purchased from a hardware store.  It's a pretty strong gage and if you buy a long length you can cut to your own tree size.  You might also want to "grind" down the end a bit so that it will be sharp enough to pierce the fabric.  Any "bauble" can be added to the end.  I used a pretty vintage earring on one of the completed trees.

Here are all the petals cut in the various sizes.

Begin by folding your petal in half...


then fold your flower into half again. (Quarters)


Once you have several petals that have been folded into quarters (half then half again makes the quarter)


You can push the fabric onto your wire. (This is why you would want the point of your wire sharpened.)


Once you begin to get several on the wire you can spread them out a little to see how many more you want to add.  The fullness is really up to you!


For the base of my trees I glued green rick-rack around a "used" wine cork.  The stand for my trees are old facet handles that I glued to the corks.


For these trees I stacked red flower, teal flower, red flower, teal flower.
In between the satin petal rows I added rows of tulle in red and teel.
I did cut flower petals from the tulle, but on a couple of them I cut circles and pushed the wire through the center of the tulle circles.  The tulle circles did not stand up and fill in as nicely as the folded tulle petals, but it did look more like a little petticoat.
I say...just experiment.


The trees were quick and easy (and were mindless work that could easily be put down.)
I'm thinking of making some pink and white ones this week.
OH...I'm gone to a wedding this weekend, so guess there won't be any trees this week!
I'll try to capture the beautiful bride and groom on their special day!
SOOO...till next week,
debi
Tuesday, December 14, 2010

Christmas Projects

I have been on a "getting rid of binge" lately.  I have been merciless in moving out furniture, fabric and "STUFF". 
I spent Saturday going through the grandkids room, cleaning out the closet and removing toys they no longer use in their play.  Of course, clearing out means I have to "stage" the stuff some place to go through it, then the girls come and go through it...AND THEN it can finally leave the house.
Recently it seems there have been so many others that need items and I've been happy to see those carried away.  Two wing chairs to a recently separated husband without furniture, other smaller other items to a homeless family that just got into an apartment.
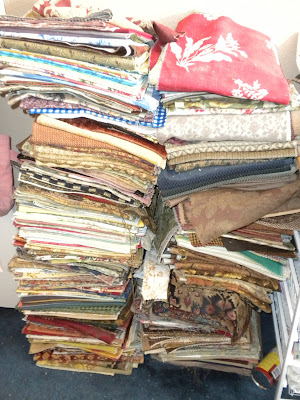
My biggest "stash" is fabric.  My girlfriend's husband is the sweetest to keep me in fabric (who needs diamonds? HA!...but there is only so much a girl can have!)

These two stacks of fabric reach to just above my waist!


I won't even begin to show you all the fabric I have stacked up...
In the past I've given some of the larger pieces to a group of quilters in Van Alstyne who are making quilts for injured and returning vets.  They do some amazing work!
One of the quilting ladies came to the house to go through the stacks and take what she thought the quilters would use...she was so happy (and I was happy to see several arm fulls being loaded into her car!)

If you leave near McKinney and could use some fabric...give me a shout! (there are 5 more stacks like this one!)


In going through each piece and deciding what I would KEEP helped me solidify some items I've been wanting to finish. (I'm also on a burn to complete or get rid of incomplete projects!)

This Santa cross stitch was made by my mother MANY years ago (so many I don't even remember!)  Every year I tell myself I'm going to make it into a pillow cover, but when I collect the fabric I think will look right, it just never seemed to be the right combination.

While organizing the fabric by weight, style and material (yes...it's easier for someone to take what they like that way!)  I found two really pretty chenille combinations that I liked.


I first stabilized the cross stitch before I sewed the strips along each side.  The red went along the top and bottom and the stripes along the sides.


Here's the front of the pillow...thanks Mom...I think it turned out cute!


Since I'll be using it as a cover for my "regular" pillows I made the back open with just a "tuck in" for the other pillow.  No buttons or closures...very simple.


I also discovered other fabric combinations while organizing the fabric.  These two seemed perfect for each other...and for the Santa picture.
These are probably not combinations the manufacturer would ever pair together...but hey...they looked perfect to me!


I'm currently working on many items, and completing several projects, but this time of year there's just no sharing (too many snoopers!)

I can give you a sneak peek of the latest plate I completed yesterday. 
More on them next time.

Till tomorrow...
debi

Thursday, December 9, 2010

Stocking Hangers

Believe it or not, in his spare time my husband is a Blacksmith. He is able to create some pretty incredible items.  He always says, "If you can draw it, I can create it."  He does a pretty good job at some of my drawings and ideas.

I really wanted some stocking hangers, but didnt' want to spend the money on the "novelty" kind.  Most of them are too formal or too cutesy.
Being from Texas...why not a Texas theme.

We purchased some large architectural stars, horse shoes, and some small stars that had a nail attached.


He began by attaching the small nail head star to the horseshoe. (He welded these pieces together.  His advice, find a welder!)  I cut felt to line the bottom of the horseshoe so they would not scratch whatever surface I might place them on.


Next, he welded the large star to the horseshoe.  Once everything was put together, the stars can be spray painted whatever color you like.
The space between the small star and the large star can nicely fit a DVD or something else that won't quite fit in the stocking.
 

I like to line them up the stairs.  They are weighty enough to hold a full stocking!
We are going to need a couple of more this year, so he better get busy.  Not much time between now and Christmas.

You can also line them up on the mantel, but with 10 of us...it's easier to place them along the stairs!

Till tomorrow,
debi

Wednesday, December 30, 2009

Projects

I received a phone call about my Santa poster from yesterday, so for those of you that asked (and are close by)...you can purchase your very own Santa poster (if there are any left) at:
Beaucoup
635 West Campbell Road, Suite 308,
Richardson, TX 75080
(972) 235-7906

And while you are there, be sure and eat at the Chocolate Angel and shop at Bradbury Lane, which is right next door.
Bradbury Lane
635 W Campbell Road, # 236
Richardson, TX 75080

Bradbury Lane also has a website if you can't get by the store.
http://www.bradburylane.com/

Tuesday, December 29, 2009

Projects

I know...it's been awhile. Projects, family, work...it seems there is hardly time in the day to complete all I want to do. However, I did get some time to create a "few" items before Christmas.

I purchased this poster (4 of them) on sale after Thanksgiving. The girls don't have a lot of Christmas decorations, so I thought we could work on these and create something larger-than-life to use for decorating. The first thing we did is affix the large sheets of paper to a stretched canvas. I used Mat Gel to glue it down and smooth it out. Once it was dry I used the Fragile crackle 2 step process to crackle the paper.

One that was dry I rubbed a dark brown and then an aqua color into the cracks to highlight the crackle process.

Then began the embelleshment using glitter, beads, and various decorations.
This is gold glitter added to the Christmas Tree.
Red glitter was used on top of the words...
and a dark black German glass was added to the belt and other areas.
I also used some small gold beads around the toys, colored bead on the drum and some "ready-made" snowflakes in the sky. I used Snow-Tex for the beard and hair. The girls are still in "various stages" of decorating their own...but they'll all be finished for next year!
Our major project this year was Lauren's doll bed. She has three 18-inch dolls and really wanted a bed for ALL of them. Peter came up with the plan and went to work designing the bed, building the frame, staining the beds.He even added the small railings so the "girls" would not fall out while they are sleeping.My job was to create the bedding: mattresses, pillows and blankets.Needless to say...Lauren was thrilled. She immediately put all her girls to bed and tested it out!

She was a very happy girl! Now...she wants a ladder!